Strong Knots That Are Easy to Untie
"If you don't know how to tie knots, then tie a lot." You have most likely heard that before, or may have even said it yourself. We are here to fix that. Rather than just 10 knots, we assembled five knots and five hitches that are all easy to learn and tie. But before diving into them, it's important to understand a few knot-tying terms so you can get the most from our suggestions.
- Working End (aka the Running End): The end of the rope that is used to tie the knot. The rest of the rope is referred to as the standing part.
- Loop: When you place the working end of the rope over or under the standing part of the rope you form a loop.
- Bight: When you double back part of the rope against itself without crossing over it's called a bight.
- Knot: A knot is used to join two ropes together or a rope to itself.
- Hitch: A hitch is used to fix a rope to another object. Some sources suggest a hitch is a type of knot, but a distinction is warranted for many.
- Bend: A type of knot used to join two lengths of cordage.
Here are 10 useful outdoor knots and hitches that almost anyone could tie blindfolded. Please also note that these knots and hitches are not intended for use in climbing or rappelling unless specifically mentioned to do so.
5 Basic Knots to Use in the Outdoors
1. The Bowline Knot
The bowline is often referred to as the "king of knots" and for a good reason. It is an incredibly useful knot that has been around for a very long time. (One was found on the rigging of an excavated Pharaoh's ship dating to 2500 BCE.) It is also one of the coolest mnemonics ever put together to help everyone learn how to tie it.
How to tie a bowline knot:
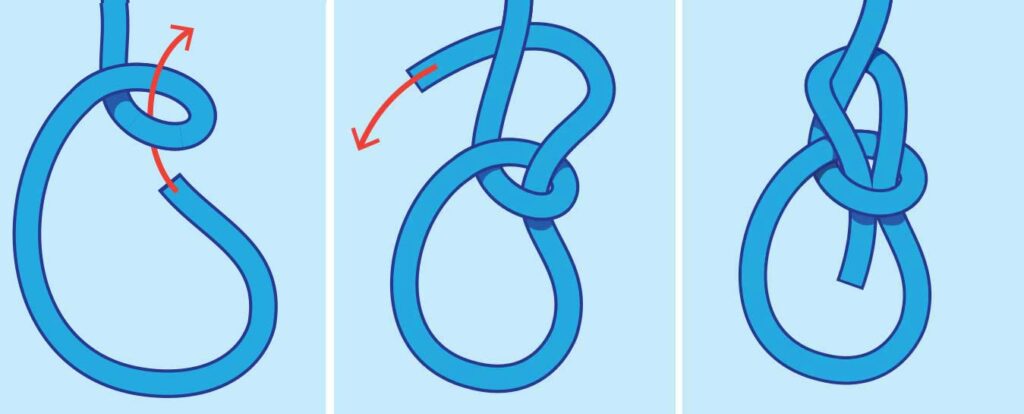
- Form a loop made near the working end of the rope. Consider that loop a "rabbit hole." Now take hold of your working end, "the rabbit."
- Push the "rabbit" up through it's "hole."
- The rabbit comes out of the hole and around a "tree" (the standing part of the rope). After rounding the tree, the rabbit goes back down the hole.
You can tighten up the bowline knot by grasping the working end and the side of the loop and remove any slack.
The greatest thing about this knot is you can put it under lots of pressure and it will still untie rather easily. As mentioned, the bowline is an excellent choice for sailors to tie down a boat, including your favorite canoe or kayak. You can also use it to hang your hammock for quick and easy setup, and takedown. It gets a lot of use as a rescue knot to tie around a person very securely without squeezing and hurting them. In short, anytime you need a secure loop in a rope, that is easy to untie after use, the bowline is the one to know.
2. The Heaving Line knot
The heaving line knot is simple and is put together to add bulk and weight to the end of a rope so it can be thrown more easily. It's great for throwing cordage up to a person in a deer stand, throwing rope from your boat to a dock, or throwing a rope over a branch to hang a bear bag in a tree.
How to tie a heaving line knot:
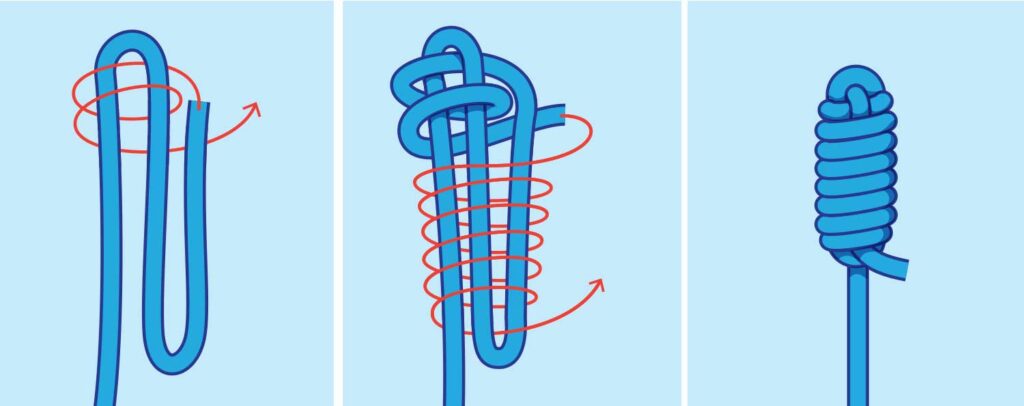
- Make two bights and put them next to one another.
- Pass the working end through the top bight and wrap it around both strands of cordage, ensuring the line does not cross on the way down.
- Push the working end through the opening of the bottom bight to finish the knot.
- Tighten up any slack by first pulling the top loop, then down on the remaining cordage.
3. The Prusik Knot
This is a great knot to impress friends and influence people with. It is a knot that slides when you want it to slide and grabs when you want it to grab. This a great knot to tie along another rope (second rope must be bigger in diameter for it to be effective), or along a cylindrical pipe or tube.
How to tie a Prusik knot:
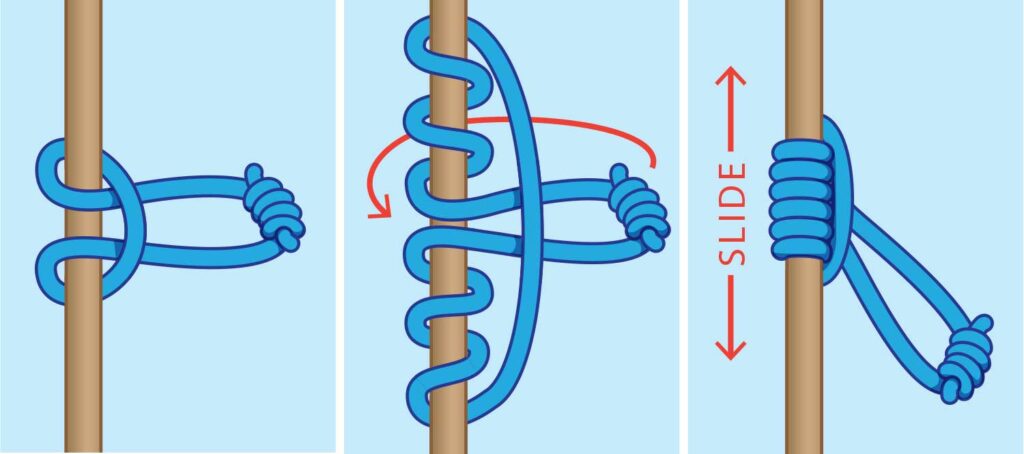
- Form a loop that you lay upon the rope, pipe, etc. you are tying to.
- Wrap the cordage three times, inside the loop.
- Ensure that the turns lie next to one another and do not cross.
- Pull the knot tight.
When you need it to slide, grasp it at the turns and slide it along. When you need it to bind, pull from the extended, looped end. This serves as a great backup for climbers and those who rappel. It also serves as a great way to tie off ends of a tarp on a ridgeline, or to help secure gear or a person on a steep incline.
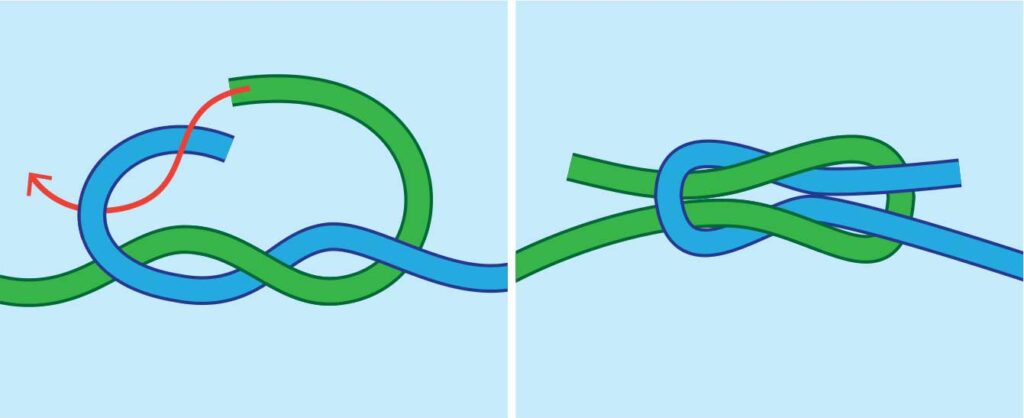
4. The Fisherman's Knot
This is most commonly known as a knot. Technically though, anytime you tie two pieces of cordage together it is a bend, so you will hear it called both names. As you would guess, this is used to join two pieces of cordage that are similar in size, together.
How to tie a Fisherman's Knot:
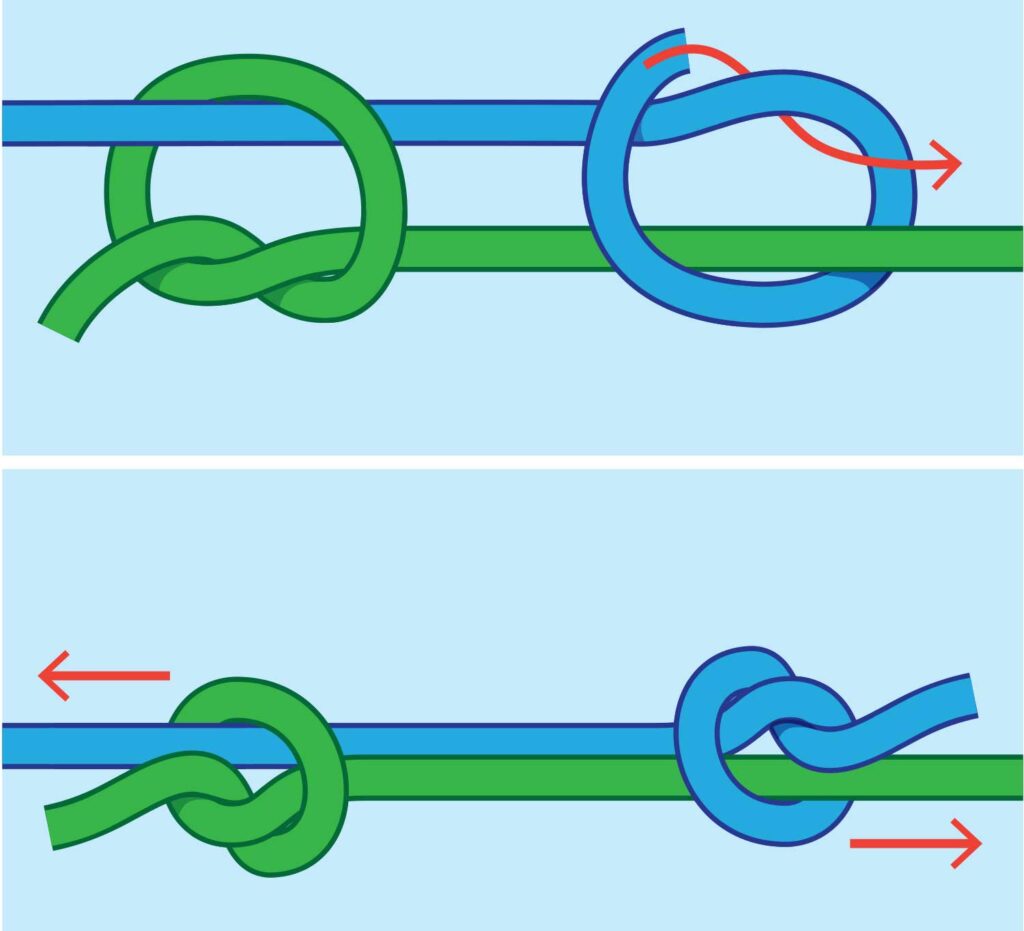
- Bring the working ends of two ropes together. The working ends should be pointing in opposite directions of one another.
- Use one working end to tie an overhand knot around the other rope's working end. Then repeat those steps with the second piece of cordage.
- Tighten each individual knot, then slide the two knots together by pulling on each rope. Each knot serves as a stopper for the other.
As a safety measure, you can tie off the "tail" left behind along the rope as well. The best thing about this knot is that even after it is put under lots of pressure, it unties rather easily. It's a great basic knot to use any time you need to join ropes.
5. The Square Knot (Also Known as The Reef Knot)
This is arguably the best-known knot but not the safest by a long shot. This knot is used to tie two ends or two different pieces of cordage together. It will get the job done but be forewarned that it should not be used when a lot of pressure is expected (because it is nearly impossible to untie) or when its use is critical (because it is also known to fail). It is a very quick and dirty knot that gets the job done. This is usually the first knot we all learn because it is the underlying knot when we tie our shoes. We just add some bights to make it easy to untie. This knot is also commonly used to tie a bandana around your neck so that it hangs symmetrically. There are many variations to this simple knot but here is one set of steps for tying two ropes together.
How to tie a square knot:
- Tie two overhand knots, with the left over the right, then the right over left.
- Ensure that each working end exit exits with the standing end of its own rope.
5 Basic Hitches to Use in the Outdoors
1. The Trucker's Hitch
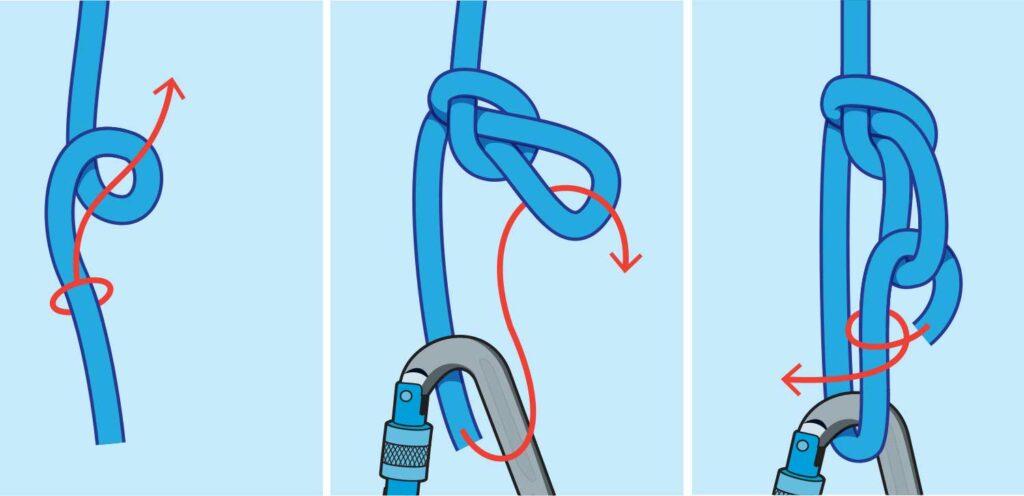
The funny thing about a trucker's hitch is that is also called a paddler's hitch, power cinch knot, and even a farmer's hitch. It seems everyone wants to claim it, and for a good reason. This hitch is a great set up to help pull a rope tight and keep it under pressure, then untie it easily for another day. As you can expect this hitch is used to secure loads down to anything. You can secure a deer to an ATV, a canoe to a truck, create a ridgeline for shelter, and so much more.
How to tie a trucker's hitch:
- Form a bight in the cordage and use it to make a "pulley" in the rope. The "pulley" can be a simple overhand loop, figure-8, or alpine butterfly.
- Wrap the tail of the rope around a secure point, then back through the loop you created in step 1.
- Finish securing the knot with two half hitches (see below) that are below the loop.
- Use a half hitch knot with a bight for a quick release adaptation.
Read Next: How to Tie The Strongest Fishing Knots
2. Two Half Hitches
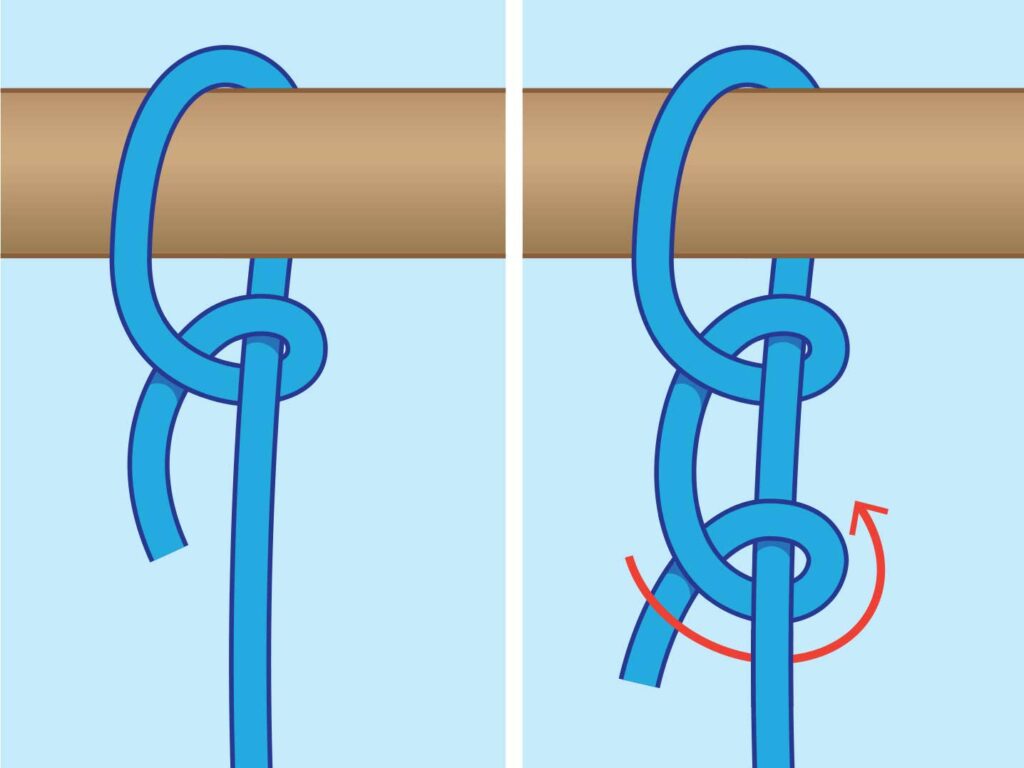
Tying two half hitch knots (never just one) is a great way to secure a rope to a post, tree, ATV, truck, tractor, or basically anything. It is often used to tie off a canoe to a bank, hang deer for processing, secure tarps to stakes, or to secure more gear to your pack. It works well, especially in concert with other hitches or connection points in which you can pull it tightly to hold a load.
How to tie two half hitches:
- Take the working end of your cordage and pass it around your connection point (pole, tree, etc) then around itself.
- Then pass the working end between the ropes to make one half-hitch. Remember, only one is very insecure.
- Pass the working end around the rope again to make the second half hitch knot.
- Dress up the half-hitches to remove any slack and push them together for something more secure.
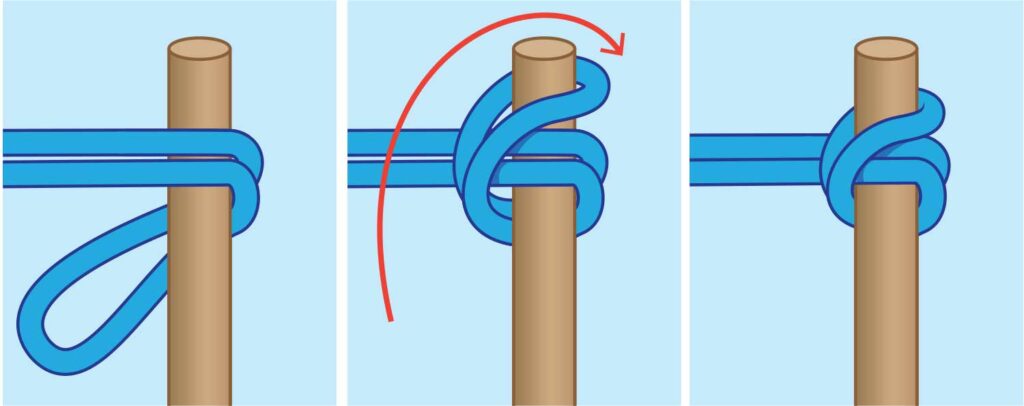
3. The Clove Hitch
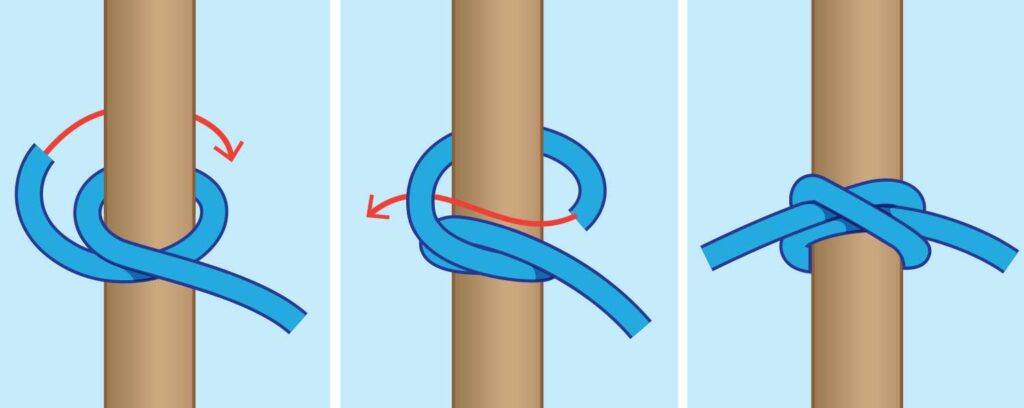
The clove hitch knot is tied two different ways depending upon how it is being used. Method number one involves tying it to a post or tree that you cannot reach the top of.
How to tie a clove hitch (method one):
- Make a turn with your working end around the tree.
- Cross over the standing part of the cordage.
- Tuck the working end under the standing end of step 2 and pull tight.
Another use for this hitch is when you can reach over the top of a post. You can also use this to secure a small object that acts as a holding piece when using it to secure part of a tarp. If a loop or grommet on a tarp is torn out, you can use this to secure cordage to it instead.
How to tie a clove hitch (method two):
- With two pieces of the same rope in hand, place the one in your right hand on top of the one on the left.
- Hold that with your left hand, as you do it again with a second loop.
- Place the second loop behind the first loop.
Now slip both of the loops over an attachment point. It could be a fence post, cut off tree, or around an acorn wrapped in a tarp.
Keep in mind that this hitch is effective when the load is pulled at a right angle to the attachment point. Anything else, and it starts to loosen.
Read Next: How to Be a Knot Geek
4. The Pile Hitch
When you want a hitch that is simple, look no further than a pile hitch. Sometimes referred to as post, or stake hitch. It works great when you are attaching to anything that is upright that you can reach over the top of.
How to tie a pile hitch:
- Take a bight in the rope and wrap it around your point of anchor.
- Ensure the loop goes under the standing part of the cordage.
- Now place the loop over the top of the post, stake, etc.
You can alternatively use this hitch to secure cordage to a handle and turn the handle to pull slack and tighten the standing part to anything needed. You will want to secure the handle once you finish tightening, so it does not loosen.
5. The Killick Hitch
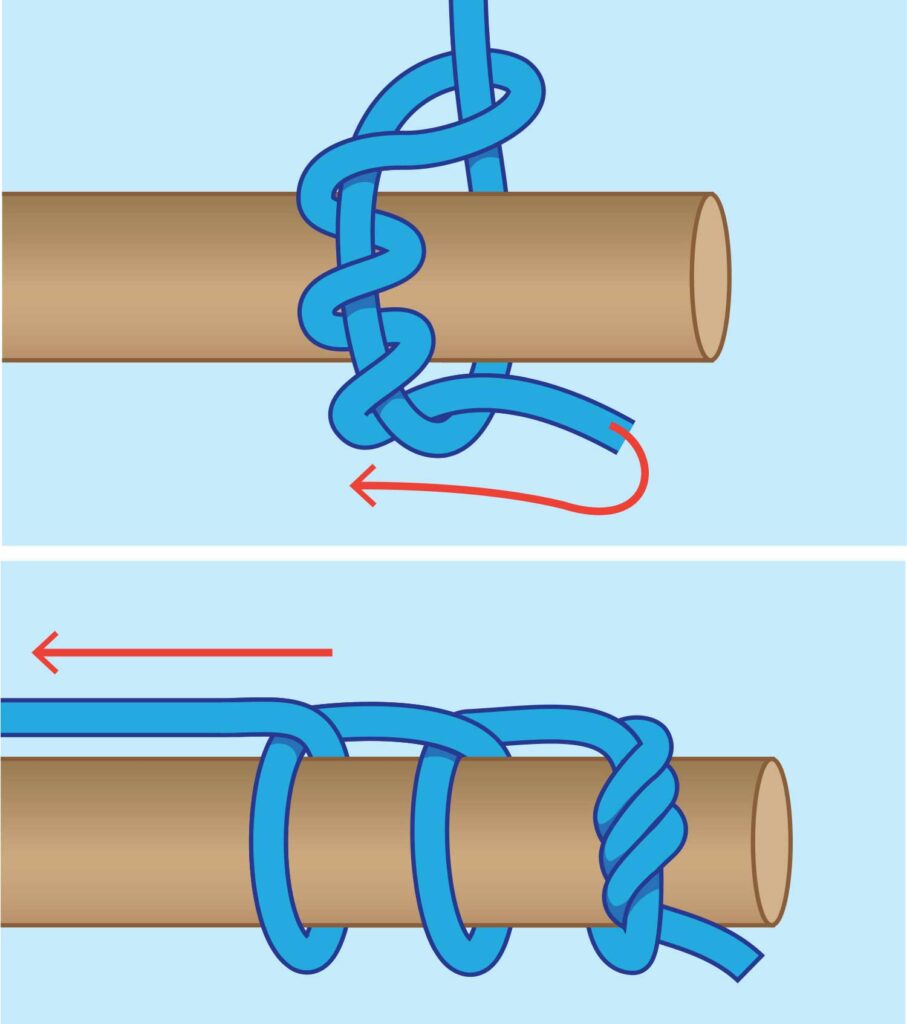
The killick hitch is also known as a timber hitch. Historically it was used to haul or pick up logs and trees. It can also be used as a self-tightening lock on piles of sticks, pipes, or other lengthy objects. This hitch can also be used as a quick-release method of attaching to a tree or post.
How to tie a killick hitch:
- Wrap the working end of your rope around your anchor points and then wrap several wraps around the standing part.
- Tighten and cinch the result down to your anchor.
- If you use this for dragging then repeat some half-hitches along the length for straighter dragging.
That about sums it up for some really simple, easy-to-tie knots and hitches. We have offered some uses here, but those uses are only limited only by your creativity. Use them in any way that you see fit, and please get some practice before you need them in the field.
Source: https://www.fieldandstream.com/simple-knots-and-hitches-sportsmen-need-to-know/
إرسال تعليق for "Strong Knots That Are Easy to Untie"